Pages

Showing posts with label vinyl. Show all posts

Thursday, October 23, 2014

Etsy Signs {Day 23}

Here are a few of my favorite ... signs.

Did you know I have an Etsy shop? Sure do. I sell custom-made signs. Here are a few I've made lately.


Thursday, November 7, 2013

Wedding Anniversary Sign {DIY Art}

Two of my closest friends from my life in Las Vegas got married this weekend. That's two weddings, two happy brides, and of course their happy husbands.

For one of the lucky-in-love ladies, I made an anniversary sign. I posted this sneakpeak on Facebook when I finished it and she swooned. Swooned!


I have to admit, I love how it turned out. Kinda awesome when that happens! 


I started by sanding my section of 1X6. It's about 10" long. No, the pen, chapstick and nail clippers are not the tools I used--ha! I was using those to put the font in perspective. It happened to be one of the only pictures I took of the sign, and with my cell phone late at night... It was such a busy week I completely neglected to take real pictures!

Anyway, after the sanding, I planned to paste down some pretty patterned paper. I had asked the bride what her wedding colors were and she said black, white and champagne. Fancy! I ended up not liking the plain paper, pattern and all, so I ripped it in strips and mod-podged it on. Then I sanded the edges of the paper to make everything nice and smooth.

Next, I cut out 5" letters of the couple's last name with my Cricut in white vinyl. This font is super skinny and really hard to get the letters to lay straight, but I think they ended up being pretty straight. I then cut the wedding anniversary date in 1 1/2" letters from black vinyl using a straighter font which was much easier to work with!  


 I'm so pleased with how this turned out that I listed it as an example of customized signs in my Etsy shop. You can order one if you don't have the inclination to make one yourself!

We might be 7 days into November, but it's Day 26 of my 31-Day Series for October. We'll get there!


Sunday, October 6, 2013

Children's Art Display Board {DIY Art}

Today we have another of my favorite creations to share with you!

  
It's Day 6 of my month-long series for October!


It's also the weekend, so I'm doing another re-post, this one from April 2012. You most recently saw this sign in our classroom tour, but it's a little beat-up due to frequent moves. I will glue the clothespins back on soon, and it'll be as good as new!  
  
Kids can be prolific artists. I love being able to hang my sons' artwork somewhere visible and the fridge just doesn't cut it sometimes!


In my recent hall makeover you saw my developing gallery wall that includes this art display board. I love how it turned out, but the idea was not original. This pin is what really got me started on this project.

Source: Random Thoughts of a Supermom

I had the perfect board hanging around so I painted it blue. Why blue? Um, because this shade of blue is my new favorite color. It's from our master bedroom ceiling--which is reason #2--I had it around! Yay for free!
 

I thought maybe I'd just use my Cricut and black vinyl and be done, but I'd seen an interesting technique using contact paper instead of vinyl, painting over the letters and then peeling them off so your words are the color of the base coat. Had to try it.


For you A students taking notes, the contact paper was super easy to work with and cut just fine in my machine. I eyeballed the layout and when everything was good enough, I really rubbed those letters onto the board with a used-up gift card. Who needs fancy tools? 


I slapped on a couple coats of slate-black paint and started the task of peeling off the letters. That's when I ran into trouble. I don't have a great record of straight lines and paint, and this was no different. Some letters bled, others peeled off a tiny bit of paint. 

I gave up and the board sat around in various resting spots in our house... Seriously. I found these process pictures in my "February" folder. It's April now. 

Eventually I prevailed and with the help of a Sharpie to smooth the outline of the letters it was good enough. 


The next step (which I apparently didn't photograph) was to paint clothespins and glue them on the board with hot glue. In less than an afternoon, my project was done at last!


I used long screws drilled right through the board and into the wall. Professional, I am not. I hung the board low enough that my boys can hang their art whenever they want to. This is a collection of those awesome water color pages where the paint is already in little dots all over the picture--do you remember doing those? My husband apparently had this book when he was young. Aw. It's vintage! 

(Am I the only one bothered by things from the 80s being called vintage? Yikes!)
 

So there you have it! This project took, oh, a day, give or take three months. It was also free as I had everything on hand. The boys are loving that they can see their art on display!

*****

Thanks for joining me for Day 6 of the series! Have a great rest of your weekend!

Saturday, October 5, 2013

Best Daddy Sign {DIY Art}


I'm pulling out an oldie, but this was a popular post and I still love this sign! It's Day 5 of my 31 Days of DIY Art for Your Home! Yes, we're even blogging on weekends!


Before there was Pinterest, I saw this sign and knew I wanted to recreate it.

I believe credit goes to The Handmade Home
 
I made my version for my husband Gary for Father's Day 2012. It would be a great gift for a birthday or Father's Day, and can easily say "Grandpa" instead of "Daddy."

I chose to keep my version simple by using a piece of board, my Cricut and black paint.

First I sanded the wood down to make the edges smooth, then I stained it with 'special walnut' stain. You should totally wait for the stain to dry, but I cut out the vinyl letters with my Cricut and started sticking them on while it was still wet. Well, vinyl doesn't stick to wet stain, so I added a little poly to make them stay in place and it worked great. Still, don't do what I did! Have some patience and wait for the stain to get good and dry!


If you hadn't noticed, I didn't pay too much attention to my inspiration picture and my quote is a little different. Oh well--it still rhymes!

The next step in the process is to smear black paint all over your kids and freak out that they might touch something! No, really, they've done this before and know the concept. Well, except for the one-year-old who was super tight-fisted, except when he tried to lick the paint! His hand print isn't perfect, but that's ok!

I added my kids' names with more vinyl letters, then sealed it all with poly.


Daddy likes his new sign and we have a lasting memento of when our boys were 5, 3 and 1. Aw...

And there you have it, five signs that you can make for your own home or give as gifts. Have a great day!

Friday, October 4, 2013

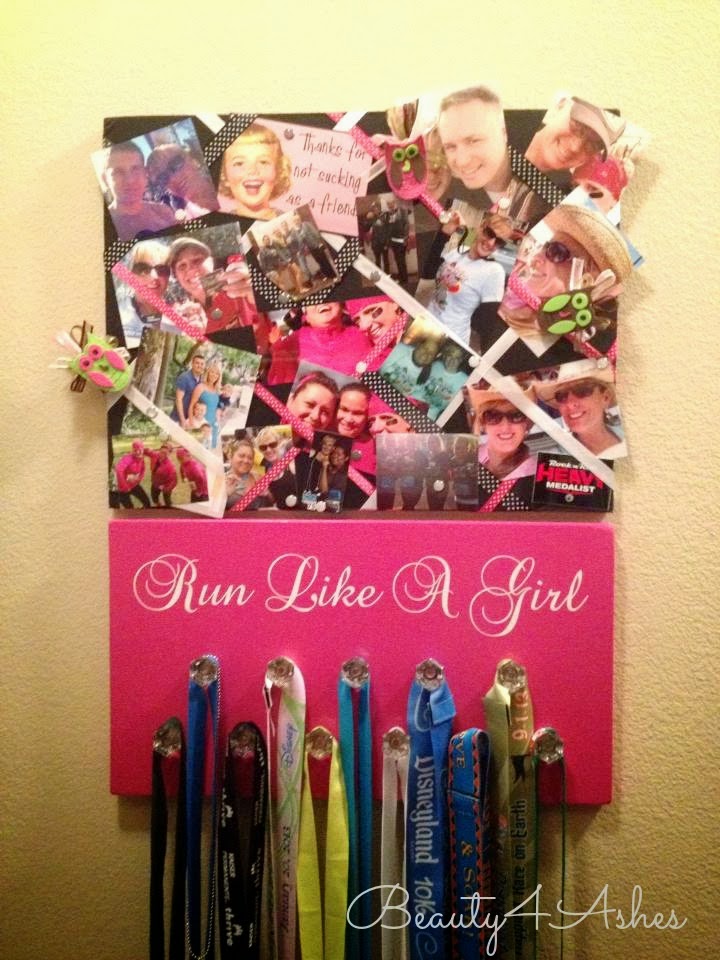
Run Like a Girl! {DIY Art}


It's Day 4 of  my 31 Days of DIY Art for Your Home series! I'm having fun, are you? If you've missed any, you can see Day 1 here and Day 2 here and Day 3 here. 


Today's art is a sign that a friend of mine asked me to make for her. She had seen the idea somewhere and wanted to have a sign that says "Run Like a Girl" with knobs to hang her medals from her runs. My friend ordered the vinyl for the quote from someone on Etsy and found the knobs at Walmart.com.


My friend knew she wanted the sign to match the size of the memo board above it, so I had specific measurements to work with. I also had my husband's help, and that turned out to be a big advantage!


I bought a 1 X 12 board from Lowe's and Gary cut it to the right length. I sanded the board by hand being especially attentive to the edges. (And then we moved from Ohio to Nebraska and the whole thing got put off while we unpacked for a few weeks. Good thing my friend is patient!) I used a small bottle of "magenta" paint from the art department at Walmart and gave the board a couple coats of paint. Next time I would buy spraypaint in a gloss finish because the paint dried rather flat. It just wasn't bright and exciting, so I used a spray-on poly to give it some shine. Learn from my mistakes and go with the glossy spraypaint, because the poly just wouldn't dry uniformly shiny! Gary ended up taking it to work where they were finishing window and door trim that day and he gave it a couple good coats of lacquer. It's wonderfully, perfectly shiny now!

Those extra dots are shadows from the knobs. Oops!
The next step was to apply the vinyl which was easy--just measure, peel the sticky side off, place the quote, rub it carefully with a credit card, then peel off the backing at an angle. I then measured for the knobs, spacing them equally. Again, my friend requested 11 knobs and that they were staggered like this. You could make a wider sign and just have one row, or only do 5 or 6 knobs if you don't have as many medals to hang. It's totally up to you!


I was super nervous to drill holes for the knobs, so I asked Gary to do it. I know I could have, and if it hadn't been for a friend, I wouldn't have been so nervous! I just wanted it to be perfect, which is exactly how it turned out, thanks to Gary! 


I added a hanger to the back with a couple of tiny nails, then wrapped it in bubble wrap and sent it to my friend. Everyone is thrilled with how it turned out!

So this isn't a step-by-step or illustrated guide, it's just a friendly reminder that you are creative, that you can dream up and make whatever it is you want to make. If you see a sign that inspires you but you can't afford it or you want it a different size or color, make it! It's possible! Boards from Lowe's or Home Depot are really affordable, and most times they'll cut it to your size for a very small price (if any). Spray paint is available at the same place you buy the board, or at Walmart or any number of craft stores (Michael's, JoAnn, Hobby Lobby). Those stores also sell pretty knobs like my friend found for her sign. You could also try Ebay if you're doing quite a few of them. As far as the quote goes, you can be like my friend and order it from a seller on Etsy. I have a Cricut machine and lots of people have Silhouettes, so you could use a font you have or ask a crafty friend if they'll let you cut with their machine if you supply the vinyl. You could use a stencil, or if you have amazing handwriting, just paint it on! The sky and your imagination are the limit!

Make something this week!

Wednesday, February 1, 2012

Vinyl & Canvas Art


I should have been painting the hall but I wanted to do something easier while my boys were awake. So I broke out the Cricut and experimented with cutting some vinyl. 

I've been wondering just what to do with this wall since I started our bedroom makeover in October. I love these canvasses and knew I wanted to hang them here, but it just wasn't enough by themselves. In our old master bedroom, we had them leaning on shelves, but since this room is smaller there isn't enough clearance on that side of the bed to feel comfortable with shelves that come out 4 inches from the wall. 


Cutting and applying the vinyl was a learning process, but I'm thrilled with how it turned out! Not to mention, I just adore this quote! 

I have found the one whom my soul loves. Song of Solomon 3:4 

Our room is really coming together! Hopefully I can cross it off the to-do list soon!


LinkWithin

Related Posts with Thumbnails